Creating layers
1. Layers overview
Layers are the elements that make up a project. Without layers, a project is only an empty frame. Use as many layers as necessary to create your project. Some projects contain thousands of layers, whereas some projects contain only one layer.
You can create several kinds of layers:
*Video and audio layers that are based on footage items that you import, such as still images, movies, and audio tracks
*Layers that you create within AE to perform special functions, such as adjustment layers
*Solid-color layers that are based on solid-color footage items that you create within AE
*Synthetic layers that hold visual elements that you create within AE, such as shape layers and text layers

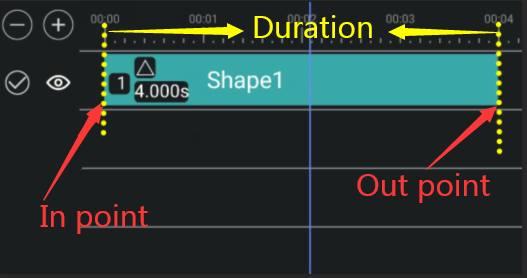
By default, the duration of a newly added layer is 4 seconds, except for video, GIF, and music layers, which determine the duration of the layer based on the duration of the original footage.
When adding a layer, the layer's entry point is related to the current-time indicator (CTI). The newly added layer entry point is where the current-time indicator (CTI) stays.

Note : The entry point of the duplicate layer is the same as the entry point of the original layer and has nothing to do with the current-time indicator (CTI).
When you modify a layer, you do not affect its source footage item. You can use the same footage item as the source for more than one layer and use the footage differently in each instance.
Changes made to one layer do not affect other layers, unless you specifically link the layers. For example, you can move, rotate, and draw masks for one layer without disturbing any other layers in the project.
AE automatically numbers all layers in the project. By default, these numbers appear in the layer, on the far left of the layer. The number corresponds to the position of the layer in the stacking order. When the stacking order is changed, AE changes all numbers accordingly.
After you add a layer to your project, in the Timeline panel, you can change the duration, start time, and position of the layer in the layer stacking order. You can also change any of the properties of a layer in the Timeline panel.
2. Create color layers
Create a color layer Click the "+" sign next to the play button, then click the "Color Layer" button. Then choose to add solid-color or gradient to enter the color editor page.


solid-color layers
The solid-color layer adds white by default.
new version :

Make sure to select a color and click the "SELECT" button in the lower right corner of the page.
To add other colors, click the "CUSTOM" button in the lower left corner of the page to enter the custom RGB color selector page.

old version :


gradient layers
Gradient layers add a black and white gradient by default.

After selecting the color, enter the following page and adjust the gradient color. Click the "√" symbol in the upper right corner to return to the editing page.
